Difference between revisions of "Old Glast Heim"
| (16 intermediate revisions by the same user not shown) | |||
| Line 1: | Line 1: | ||
| + | |||
| + | | ||
| + | |||
| + | |||
| + | |||
= Overview = | = Overview = | ||
| Line 4: | Line 9: | ||
Old Glast Heim is one of the available [[Instances|Instances]] in ArunafeltzRO. It is a dungeon where you travel back in time to aid Hugins and the Glast Heim Royal Knights in thwarting the plans of evil valkyrie Himmelmez. | Old Glast Heim is one of the available [[Instances|Instances]] in ArunafeltzRO. It is a dungeon where you travel back in time to aid Hugins and the Glast Heim Royal Knights in thwarting the plans of evil valkyrie Himmelmez. | ||
| − | + | Old Glast Heim is the only source of Temporal Crystals & Coagulated Spells. All two reagents are used in creating/enchanting [[Temporal_Boots|Temporal Boots]]. Temporal Boots combos with [[Faceworm_Skins|Giant Faceworm Skin]] to give one of the strongest sets while also providing powerful stats on its own. | |
| − | |||
| − | Old Glast Heim is the only source of | ||
| − | |||
| − | |||
| − | | + | The Holy element is most effective in this instance, therefore it is recommended to have an High Priest in your party to cast Aspersio. For new players, it is also recommended to bring Token of Siegfried. |
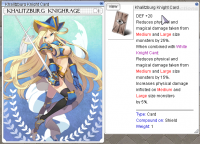
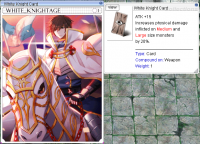
| − | + | <br/> New Cards<br/> [[File:Khalitzburg knighrage.PNG|200x200px|Khalitzburg knighrage.PNG]] [[File:White knightage.PNG|200x200px|White knightage.PNG]] | |
With enough Coagulated Spells and Contaminated Magics, you can buy two new cards from the Instance Manager. | With enough Coagulated Spells and Contaminated Magics, you can buy two new cards from the Instance Manager. | ||
| − | * | + | *White Knightage Card: 4000 Coagulated Spell or 750 Credit Voucher |
| − | * | + | *Khalitzburg Knightage Card: 5000 Coagulated Spell or 1000 Credit Voucher |
| | ||
= Walkthrough = | = Walkthrough = | ||
| + | |||
| + | |||
=== Level 1 === | === Level 1 === | ||
| Line 32: | Line 35: | ||
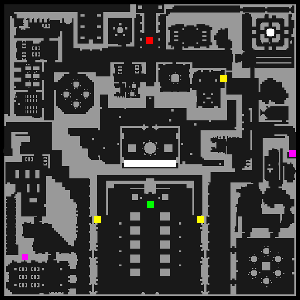
#Head north and speak to Heinrich <code>green square</code>. This will trigger a dialogue between Heinrich and Himelmez. | #Head north and speak to Heinrich <code>green square</code>. This will trigger a dialogue between Heinrich and Himelmez. | ||
#After their conversation, {{monster |id=2470 Corrupted Abysmal Knight}} and {{monster |id=2471 Suffering Khalitzburg}} will spawn. Heinrich will kill them after some time but it is recommended to kill them for {{item| id=6608 Coagulated Spells}} and {{item| id=6755 Contaminated Magic}}. | #After their conversation, {{monster |id=2470 Corrupted Abysmal Knight}} and {{monster |id=2471 Suffering Khalitzburg}} will spawn. Heinrich will kill them after some time but it is recommended to kill them for {{item| id=6608 Coagulated Spells}} and {{item| id=6755 Contaminated Magic}}. | ||
| − | #A warp will activate at the west <code>left yellow square</code>, enter it and start killing monsters until a message "Himelmez curse is getting weaker" appears. Party leader then has to speak to Altar Boy <code>left purple square</code>. | + | #A warp will activate at the west <code>left yellow square</code>, enter it and start killing monsters until a message "Himelmez curse is getting weaker" appears.Party leader then has to speak to Altar Boy <code>left purple square</code>. |
| − | #:Using the right camera angle, it is possible to speak with the butcher through the wall, saving you the hassle of having to run to him. | + | #:Using the right camera angle, it is possible to speak with the butcher through the wall, saving you the hassle of having to run to him.<br/> <br/> '''''if you ever run out of monster without summoning the'''''<i>'''evil presence'''</i>''''' go to this spot [2@gl_k,118,141] every 30 seconds you can trigger that spot to summon more monsters.''''' |
#Another warp <code>right yellow square</code> will spawn, enter it. Avoid going near the dead body as it will spawn a swarm of [http://www.divine-pride.net/database/monster/2467/maggot Maggot]. | #Another warp <code>right yellow square</code> will spawn, enter it. Avoid going near the dead body as it will spawn a swarm of [http://www.divine-pride.net/database/monster/2467/maggot Maggot]. | ||
#Start clearing monsters until the message of "Himelmez curse is getting weaker" appears. The party leader then has to speak with Blacksmith <code>right purple square</code> in order to proceed. | #Start clearing monsters until the message of "Himelmez curse is getting weaker" appears. The party leader then has to speak with Blacksmith <code>right purple square</code> in order to proceed. | ||
| + | #:'''''if you ever run out of monster without summoning the'''''<i>'''evil presence'''</i>'''''go to this spot [2@gl_k,118,141] every 30 seconds you can trigger that spot to summon more monsters.''''' | ||
#Enter the warp <code>upper yellow square</code> that spawned and continue to clear mobs. Once enough mobs has been cleared, Himelmez, Varmundt and Hienrich will all spawn at <code>red square</code>. | #Enter the warp <code>upper yellow square</code> that spawned and continue to clear mobs. Once enough mobs has been cleared, Himelmez, Varmundt and Hienrich will all spawn at <code>red square</code>. | ||
#Once the NPCs finish their conversation, [http://www.divine-pride.net/database/monster/2475/corrupted-soul Root of Corruption] will spawn. | #Once the NPCs finish their conversation, [http://www.divine-pride.net/database/monster/2475/corrupted-soul Root of Corruption] will spawn. | ||
#:<span style="color: red; font-weight: bold;">Please take note that you will have to be in the same screen as the MVP as it dies or you will not receive credit for the kill.</span> | #:<span style="color: red; font-weight: bold;">Please take note that you will have to be in the same screen as the MVP as it dies or you will not receive credit for the kill.</span> | ||
| − | #After killing the MVP, '''ALL party members MUST speak to Varmundt''' <code>red square</code> to receive 1X {{item| id=6607 Temporal Crystals}}. You will be unable to receive the final reward of the instance if you do not speak with him. | + | #After killing the MVP, '''ALL party members MUST speak to Varmundt''' <code>red square</code> to receive 1X {{item| id=6607 Temporal Crystals}}. You will be unable to receive the final reward of the instance if you do not speak with him. |
| + | |||
| + | |||
=== Level 2 === | === Level 2 === | ||
| Line 49: | Line 55: | ||
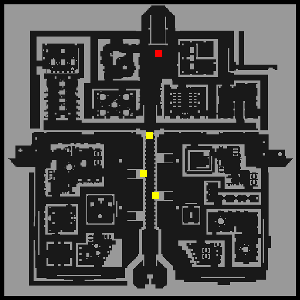
#Head north and prepare for the final encounter. | #Head north and prepare for the final encounter. | ||
#:Do note that you will be unable to exit the room once you entered until either your party has wiped or the final MVP is killed. It is advisable to ensure everyone is alive and ready to enter before going in. | #:Do note that you will be unable to exit the room once you entered until either your party has wiped or the final MVP is killed. It is advisable to ensure everyone is alive and ready to enter before going in. | ||
| − | #Head further north after entering the warp <code>upper yellow square</code> and speak to Heinrich <code>red square</code>. Himelmez will transform the final survivor into [http://www.divine-pride.net/database/monster/2476/amdarais Amdarais]. | + | #Head further north after entering the warp <code>upper yellow square</code> and '''speak & get near to Heinrich''' <code>red square</code>.'''Wait for the dialogue to start & Himelmez will transform''' the final survivor into [http://www.divine-pride.net/database/monster/2476/amdarais Amdarais]. |
#:[http://www.divine-pride.net/database/monster/2476/amdarais Amdarais]cast Hell's Judgement and Dark Grand Cross as his main damaging ability, it is advisable to place Pneuma on the party while the tank wears a {{item| id=4119 Bathory}} carded armor. | #:[http://www.divine-pride.net/database/monster/2476/amdarais Amdarais]cast Hell's Judgement and Dark Grand Cross as his main damaging ability, it is advisable to place Pneuma on the party while the tank wears a {{item| id=4119 Bathory}} carded armor. | ||
#:<span style="color: red; font-weight: bold;">Please take note that you will have to be in the same screen as the MVP as it dies or you will not receive credit for the kill.</span> | #:<span style="color: red; font-weight: bold;">Please take note that you will have to be in the same screen as the MVP as it dies or you will not receive credit for the kill.</span> | ||
| Line 64: | Line 70: | ||
! style="background-color:#B6D4D9;" | Name | ! style="background-color:#B6D4D9;" | Name | ||
! style="background-color:#B6D4D9;" | HP (Normal) | ! style="background-color:#B6D4D9;" | HP (Normal) | ||
| − | |||
! style="background-color:#B6D4D9;" | Race | ! style="background-color:#B6D4D9;" | Race | ||
! style="background-color:#B6D4D9;" | Element | ! style="background-color:#B6D4D9;" | Element | ||
| Line 70: | Line 75: | ||
| [[File:MG AMDARAIS.gif|RTENOTITLE]] | | [[File:MG AMDARAIS.gif|RTENOTITLE]] | ||
| {{monster |id=2476 Amdarais}} | | {{monster |id=2476 Amdarais}} | ||
| − | | | + | | 107,000,000 |
| − | |||
| Undead | | Undead | ||
| Undead 4 | | Undead 4 | ||
| Line 77: | Line 81: | ||
| [[File:Corrupted Soul.gif|RTENOTITLE]] | | [[File:Corrupted Soul.gif|RTENOTITLE]] | ||
| {{monster |id=2475 Root of Corruption}} | | {{monster |id=2475 Root of Corruption}} | ||
| − | | | + | | 45,000,0000 |
| − | |||
| Demon | | Demon | ||
| Earth 3 | | Earth 3 | ||
| Line 84: | Line 87: | ||
| [[File:MG GRUDGE.gif|RTENOTITLE]] | | [[File:MG GRUDGE.gif|RTENOTITLE]] | ||
| {{monster |id=2474 Grudge of the Royal Knight}} | | {{monster |id=2474 Grudge of the Royal Knight}} | ||
| − | | | + | | 2,000,000 |
| − | |||
| Undead | | Undead | ||
| Undead 2 | | Undead 2 | ||
| Line 91: | Line 93: | ||
| [[File:MG AGONY.gif|RTENOTITLE]] | | [[File:MG AGONY.gif|RTENOTITLE]] | ||
| {{monster |id=2473 Agony of the Royal Knight}} | | {{monster |id=2473 Agony of the Royal Knight}} | ||
| − | | | + | | 2,000,000 |
| − | |||
| Undead | | Undead | ||
| Undead 2 | | Undead 2 | ||
| Line 99: | Line 100: | ||
| {{monster |id=2468 Corrupted Palace Guard}} | | {{monster |id=2468 Corrupted Palace Guard}} | ||
| 184,080 | | 184,080 | ||
| − | |||
| Undead | | Undead | ||
| Dark 2 | | Dark 2 | ||
| Line 106: | Line 106: | ||
| {{monster |id=2469 Wandering Archer}} | | {{monster |id=2469 Wandering Archer}} | ||
| 144,370 | | 144,370 | ||
| − | |||
| Undead | | Undead | ||
| Dark 2 | | Dark 2 | ||
| Line 113: | Line 112: | ||
| {{monster |id=2470 Corrupted Abysmal Knight}} | | {{monster |id=2470 Corrupted Abysmal Knight}} | ||
| 225,789 | | 225,789 | ||
| − | |||
| Undead | | Undead | ||
| Dark 4 | | Dark 4 | ||
| Line 120: | Line 118: | ||
| {{monster |id=2472 Bloody Knight}} | | {{monster |id=2472 Bloody Knight}} | ||
| 246,751 | | 246,751 | ||
| − | |||
| Undead | | Undead | ||
| Dark 4 | | Dark 4 | ||
| Line 127: | Line 124: | ||
| {{monster |id=2471 Suffering Khalitzburg}} | | {{monster |id=2471 Suffering Khalitzburg}} | ||
| 219,275 | | 219,275 | ||
| − | |||
| Undead | | Undead | ||
| Undead 1 | | Undead 1 | ||
| Line 134: | Line 130: | ||
| {{monster |id=2465 Corrupted Monk}} | | {{monster |id=2465 Corrupted Monk}} | ||
| 100,168 | | 100,168 | ||
| − | |||
| Undead | | Undead | ||
| Undead 4 | | Undead 4 | ||
| Line 141: | Line 136: | ||
| {{monster |id=2466 Grand Chamberlain in Pain}} | | {{monster |id=2466 Grand Chamberlain in Pain}} | ||
| 208,100 | | 208,100 | ||
| − | |||
| Undead | | Undead | ||
| Undead 2 | | Undead 2 | ||
| Line 148: | Line 142: | ||
| {{monster |id=2464 Corrupted Steward}} | | {{monster |id=2464 Corrupted Steward}} | ||
| 135,600 | | 135,600 | ||
| − | |||
| Undead | | Undead | ||
| Undead 1 | | Undead 1 | ||
| Line 155: | Line 148: | ||
| {{monster |id=2467 Maggot}} | | {{monster |id=2467 Maggot}} | ||
| 80,811 | | 80,811 | ||
| − | |||
| Insect | | Insect | ||
| Earth 2 | | Earth 2 | ||
Latest revision as of 06:07, 15 January 2022
Overview
Old Glast Heim is one of the available Instances in ArunafeltzRO. It is a dungeon where you travel back in time to aid Hugins and the Glast Heim Royal Knights in thwarting the plans of evil valkyrie Himmelmez.
Old Glast Heim is the only source of Temporal Crystals & Coagulated Spells. All two reagents are used in creating/enchanting Temporal Boots. Temporal Boots combos with Giant Faceworm Skin to give one of the strongest sets while also providing powerful stats on its own.
The Holy element is most effective in this instance, therefore it is recommended to have an High Priest in your party to cast Aspersio. For new players, it is also recommended to bring Token of Siegfried.
With enough Coagulated Spells and Contaminated Magics, you can buy two new cards from the Instance Manager.
- White Knightage Card: 4000 Coagulated Spell or 750 Credit Voucher
- Khalitzburg Knightage Card: 5000 Coagulated Spell or 1000 Credit Voucher
Walkthrough
Level 1
- Talk to the Instance Manager to generate and enter the instance.
- After entering the instance, the party leader needs to speak to Varmunt, he will warn you about valkyrie Himelmez.
- Head north and speak to Heinrich
green square. This will trigger a dialogue between Heinrich and Himelmez. - After their conversation, Corrupted Abysmal Knight and Suffering Khalitzburg will spawn. Heinrich will kill them after some time but it is recommended to kill them for Coagulated Spells and Contaminated Magic.
- A warp will activate at the west
left yellow square, enter it and start killing monsters until a message "Himelmez curse is getting weaker" appears.Party leader then has to speak to Altar Boyleft purple square.- Using the right camera angle, it is possible to speak with the butcher through the wall, saving you the hassle of having to run to him.
if you ever run out of monster without summoning theevil presence go to this spot [2@gl_k,118,141] every 30 seconds you can trigger that spot to summon more monsters.
- Using the right camera angle, it is possible to speak with the butcher through the wall, saving you the hassle of having to run to him.
- Another warp
right yellow squarewill spawn, enter it. Avoid going near the dead body as it will spawn a swarm of Maggot. - Start clearing monsters until the message of "Himelmez curse is getting weaker" appears. The party leader then has to speak with Blacksmith
right purple squarein order to proceed.- if you ever run out of monster without summoning theevil presencego to this spot [2@gl_k,118,141] every 30 seconds you can trigger that spot to summon more monsters.
- Enter the warp
upper yellow squarethat spawned and continue to clear mobs. Once enough mobs has been cleared, Himelmez, Varmundt and Hienrich will all spawn atred square. - Once the NPCs finish their conversation, Root of Corruption will spawn.
- Please take note that you will have to be in the same screen as the MVP as it dies or you will not receive credit for the kill.
- After killing the MVP, ALL party members MUST speak to Varmundt
red squareto receive 1X Temporal Crystals. You will be unable to receive the final reward of the instance if you do not speak with him.
Level 2
- Head north and enter level 2 where you will find Varmundt and Heinrich. After their conversation, a warp
left yellow squarewill spawn to the north of them. Enter it and start to kill monsters. Once enough monsters have been slain, Agony of the Royal Knight will spawn. You will need to kill him to proceed. - Exit the room and enter the warp on the right
right yellow square. Start killing monsters until Grudge of the Royal Knight spawn. Kill him to proceed. - Head north and prepare for the final encounter.
- Do note that you will be unable to exit the room once you entered until either your party has wiped or the final MVP is killed. It is advisable to ensure everyone is alive and ready to enter before going in.
- Head further north after entering the warp
upper yellow squareand speak & get near to Heinrichred square.Wait for the dialogue to start & Himelmez will transform the final survivor into Amdarais. - Upon killing Amdarais, Hugin
/navi 2@gl_k 158/241will spawn in the middle of the room. Speak to him to receive Temporal Crystals. - At this point the instance is completed, however there is a secret room where you can get additional loot in level 1. Head back to level one and enter the secret room by talking to the fountain
/navi 1@gl_k 268/268. In the secret room, talk to the glass displays/navi 1@gl_k 170/136to unlock the treasure and profit.
Monsters Info
| Image | Name | HP (Normal) | Race | Element |
|---|---|---|---|---|

|
Amdarais | 107,000,000 | Undead | Undead 4 |
|
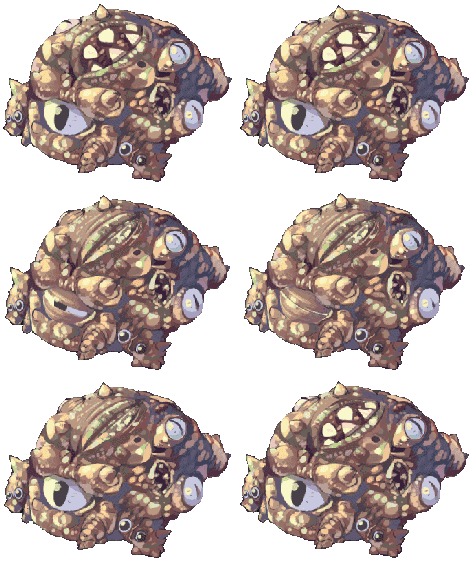
Root of Corruption | 45,000,0000 | Demon | Earth 3 |

|
Grudge of the Royal Knight | 2,000,000 | Undead | Undead 2 |

|
Agony of the Royal Knight | 2,000,000 | Undead | Undead 2 |
| Corrupted Palace Guard | 184,080 | Undead | Dark 2 | |

|
Wandering Archer | 144,370 | Undead | Dark 2 |
|
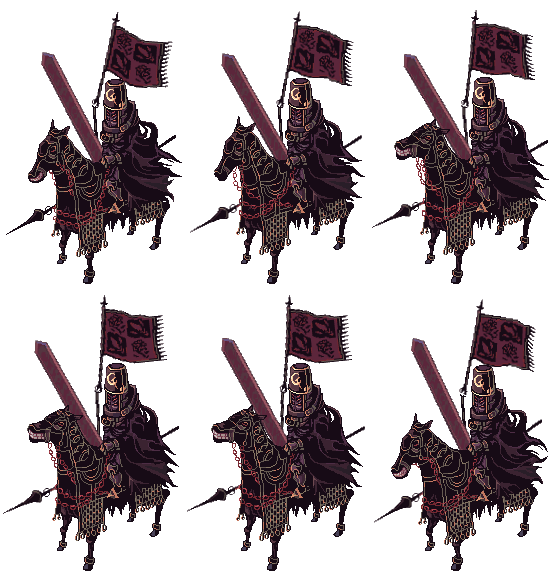
Corrupted Abysmal Knight | 225,789 | Undead | Dark 4 |

|
Bloody Knight | 246,751 | Undead | Dark 4 |
|
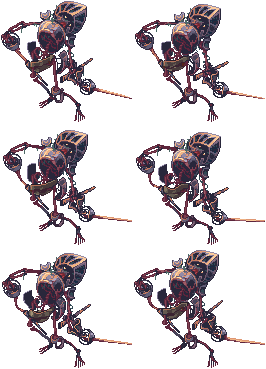
Suffering Khalitzburg | 219,275 | Undead | Undead 1 |

|
Corrupted Monk | 100,168 | Undead | Undead 4 |

|
Grand Chamberlain in Pain | 208,100 | Undead | Undead 2 |

|
Corrupted Steward | 135,600 | Undead | Undead 1 |
| Maggot | 80,811 | Insect | Earth 2 |
