
Destroyer
-
Posts
5 -
Joined
-
Last visited
-
Days Won
17
Posts posted by Destroyer
-
-
Hello There!
Are you new and starting out in the server?
This guide is made for you!Let's start with the basics of the server:
Here are some of the NPC Guides of our maintown:
Main Town - ArunaWiki (arunafeltz.net)
Other Custom NPC - ArunaWiki (arunafeltz.net)@go 0 is our maintown!
FREEBIES:As soon as you log in to the game, you will first see 3 NPCs, click on them to receive your starting items!


As for the Guild Package, follow the rules given by the NPC.
What's more in freebies?
We have Solo Pack/Gpack given by the Game Masters, submit a ticket in Discord to claim the solo pack/gpackSTARTING OFF:
PHASE 1
Since you start off as a Novice, Leveling Starts First! use the command @train and level up in our training grounds!
With the Freebies, leveling is much faster now compared to before.
A lot of veteran players will give you a "Level leech" if you ask them politely in the main town.
Best jobs when starting off: Wizard, Sniper, Assassin Cross
PHASE 2
After leveling it is most wise to do our server quests!
Our quest NPCs are located at @quest:
veil 88 127
Brok creates easy quest items at 100% success rate without failure.
veil 90 132

Chrome creates hard quest items at 100% success rate without failure.
You can check the quest items & requirements by clicking them.
Read carefully your desired headgear and make sure that your it fits your character job.
All quest requirements can be found in the command @whodrops
PHASE 3
Hunting Cards! Doing MVP Hunting is the next step towards progress.
You can hunt the MVPs on their respective maps or buy bloody branches from the tool dealer!
veil 130 111

Open "Usable Items" and on the top you can find the bloody branch that costs 10M Zeny!
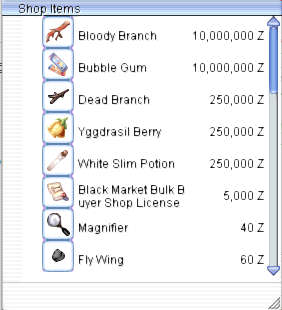
It is best to farm Zeny first in our Gold Room.veil 143 104

100m Gold Points is the max capacity in our gold room!
Make sure to create a Merchant to sell all the gold at a higher prize!
veil 158 103
Here you can find our coin exchanger which exchanges your zeny to coins, or coins to zeny
Click the NPC for more info on the exchange rate.
2Billion Zeny is the maximum zeny cap Please do not go further beyond this.veil 146 101

We now have a new way of converting your Zeny to most of our currencies!
For further more information about conversion you may check the NPC.
Our list of currencies can be found here:veil 102 80

Don't forget to autoloot and use bubblegum!
PHASE 4
More Farming! Collect cards to change to bring me coins or hunt monster to earn monster hunter coins!
veil 113 88

Mechanics: Gather the card that the NPC has given, then exchange it to gather Bring Me Coins!
Click on the NPC to view the following items that can be bought.
Note: It is better to buy Dragon Item Parts, Costume Enchant Tickets, Tier Enchant Stones and reset as well as VIP Passes to easier catch up to veteran players.
One thing more is: Use a Wizard to farm these Cards and use @aloottype +6
Farm at jupe_core and wait for Venatu Card, Dimik Card & Archdam Card to come out, or you can request it to our Developer, Dev1 (MAKE SURE TO FARM A LOT LIKE TOTALLY A LOT. 30K is the maximum numbers of items you can store on your storage, inventory or cart)veil 117 87

Mechanics: Hunt the given monster that is given by the NPC, this will automatically drop Monster Hunter Coins!
Click on the NPC to view the following items that can be bought.
Note: It is better to buy Aegir Item Parts, Costume Enchant Tickets, Tier Enchant Stones and reset as well as VIP Passes and Bloody Card Album to easier catch up to veteran players.
Just keep farming the given Monsters to earn lots of coins!PHASE 5
With the introduction of Wave Mode to the server, you can farm more of the needed currencies in the server.
It is one of the fastest way to get richer in the server!
prontera 146 75
Rules & Requirements
Sky Instance - 30x Hourly Coin, 1 Client ONLY
Forest Instance - 30x Hourly Coin, 1 Client ONLY
A better guide for Wave Mode could be found here!
PHASE 6
Enchanting! This will be the hardest part of your career!
Items Needed:
For armors:
Tier 1 Enchantment Artifact (First Tier Enchant Need 1)
Tier 2 Enchantment Artifact (Second Tier Enchant Need 1)
Tier 3 Enchantment Artifact (Third Tier Enchant Need 1)
Tier Enchant Reset (Reset Tier Need 3pcs for full enchant reset)
(Tier enchants should be around 150pcs each x3 the Tier Enchant Reset)
Dragon Armor (For Reroll)
Dragon Shoes (For Reroll)
Dragon Shield (For Reroll)
Dragon Manteau (For Reroll)or
Aegir Armor (For Reroll)
Aegir Shoes (For Reroll)
Aegir Shield (For Reroll)
Aegir Manteau (For Reroll)(Perfecting a piece of armor need around 80 pieces or more, so keep up the farming in the Bring Me Coins or Monster Hunter Coins)
P.S. you can Gather Dragon Set Package A from GM events which contains Dragon Set Armors 1pc each :D, This is also where you can gather tons of Event Tickets and MVP Coins used for costumes & costume enchanting.For Costumes:
Costume Enchant Tickets (1, 2 ,3 Tier Enchant on Costume, consumes 1 on first 2 on second 3 on third a total of 6)
MVP Coins (3pcs for reset)(You might need around 1200 pcs of Costume Enchant Tickets and 400 MVP coins to get a sure enchant at your last slot, This is just an approximate due to experience)
Event Tickets (For Reroll, Buy Blinker for mid gear it is the most cheapest for rerolling)
MVP Coins ( For Reroll, Buy Chewing Gum or Black Gangster Scarf for low gear, it is the most cheapest for rerolling)
Caps (For Reroll, Consume caps of the same ID)Since a new update has come, you can now use Costume Reroll Tickets for faster rerolling!
Other tickets such as Premium Costume Enchant Ticket, Premium Equipment Enchant Ticket, Legendary Item Enchant Ticket are now available!
You can gather Caps here:
veil 150 112

It's a bit long to get a Cap here, do it when you're AFK, You can leave it on a clicker.
More information on Enchanting? Look here https://arunafeltz.com/wiki/index.php/Tier_Enchantment_System
PHASE 7
Gathering More Donation Currencies?
You can get Aruna Credits or Aruna Donator Tokens on our Donation Currency through:
veil 94 133

The MVP Ladder (Daily, Weekly, Monthly)veil 77 87

The Other Domain - https://arunafeltz.com/wiki/index.php/The_Other_Domain@ass
Ancient Summoning System - https://arunafeltz.com/wiki/index.php/Ancient_Summoning_System
GM Events
Donations -PHASE 8
You are now available to explore other features, Go PVP, GVG and Instances since you are now on par with other veteran players.
This concludes our discussion in our Starting Out Guide!
Always keep in touch with Server Updates at the Official News Section of the Forums: https://arunafeltz.com/forum/index.php?/forum/5-official-news/
Don't forget to give the server a rating on Ratemyserver! Vote Daily and Spread the Good vibes!
Thank you for taking time to read this guide.-
 1
1
-
-
Hello Everyone, another hot issue has been striking and it is if the angelic set is better than the dragon set. I will discuss that here and now to qualify the best set at the moment.
Starting off with this notes:
1. Angelic set is NOT ENCHANTABLE
2. Dragon set is ENCHANTABLEFor a total comparison we will start off with:
HEADGEARS:


Comparison:
As you can see, Dragon Helm is BETTER Than Angelic Valkyrie Helm
Each Corresponding Effect has +3 stats and 2-5% more damage depending on the stat build
What's more is that Dragon Helm has +5% HP While Angelic gives none
Since Dragon Helm is a Donate Item, Angelic Valkyrie Helm is more ACCESSIBLE but stat lacking if compared
ARMORS:

Comparison:
Overall set bonus on Dragon set grants you +2 more stats, 2% more atk and 2% more magic resist which is lesser on Angelic set.
What else more to note is the Physical damage increase by 5% on [Mage, Archer, Acolyte, Taekwon or Ninja Class]
As well as the Magical defense increase by 5% on [Swordman, Merchant, Thief, Taekwon or Gunslinger Class]
This means that Dragon Armor is superior and BETTER than Angelic Armor
SHIELDS:

Comparison:
Dragon Shield has higher resistance to Stone Curse status and Stun status by 10% compared to Angelic Valkyrie Shield.
Dragon Shield is ENCHANTABLE while Angelic Valkyrie Shield is not
This just means that Dragon Shield is just BETTER.GARMENTS:


Comparison:
Dragon Manteau and Angelic Valkyrie Manteau has the same stats.
Dragon Manteau is still superior due to the Armor set effect and Enchants
Dragon Manteau is BETTER.FOOTGEARS:


Comparison:
Dragon Boots And Angelic Valkyrie Boots has the same stats.
Dragon Boots is still superior due to the Armor set effect and Enchants
Dragon Boots is BETTER.
ACCESSORIES:


Comparison:
Charm of Power and Charm of Magic looks better compared to Dragon Ring, Since it has increased stats in Each Angelic Armor Worn.
You can only equip ONE CHARM on the right accessory slot while you can use 2 Dragon Rings.
Dragon Rings is just more better Since you can equip two and gather extra stat bonuses. (You can also use 1 Charm and a Dragon Ring)
Since Dragon Rings are donate items, The charm and Quest Accessories are more ACCESSIBLE.
FULL ENCHANTED DRAGON ARMOR SETS ARE BETTER THAN CHARM OF POWER AND CHARM OF MAGIC EFFECTS:
Example: Charm of Power Grants 10%Atk on Armor
Full Enchanted Dragon Armor has 12% Atk
This means that Dragon Armor is Superior than Charm of Power by 2%.
Note:
Dragon Armor Max ATK and MATK enchant is 12%
Dragon Manteau Max ATK and MATK enchant is 12%
Dragon Shield Max HP Enchant is 12%
Dragon Boots Max Normal Monster Enchant is 15% and Neutral Enemy Enchant is 10%This means that Max Enchant Dragon Set is 9% more BETTER than Angelic Set with Charm of Power and Charm of Magic
CONCLUSION:
ANGELIC VALKYRIE SET IS BETTER WHEN DRAGON SET HAS NO ENCHANTS
ANGELIC VALKYRIE SET IS WEAKER WHEN DRAGON SET HAS FULL ENCHANTS
ANGELIC VALKYRIE SET IS SET ON NEWBIES TO CATCH UP TO VETERAN PLAYERS.
FULLY ENCHANTED DRAGON SET ONLY HAS A 20% ADVANTAGE AGAINST ANGELIC VALKYRIE SET.-
 1
1
-
-
Note: This is a guide for everybody, but focused on newbies
Hello Folks,
An Instance is a type of dungeon in which a specific copy is created for each individual party attempting to enter. As such, the server requires a small time period to create the instance, and it can only be used until a certain time limit before it is destroyed. Therefore, each party has the instance to themselves.
These Instances in ArunafeltzRO are semi-customized (e.g. HP of monsters, Some Card Effects, Drop rates, Some Item Effects & Requirements for Items) storyline and other components are the same and did not change.
Let us take note that:- They involve one-way (no going backwards) progressions in an NPC-narrated quest.
- They require players to be in a Party, and are "created" uniquely for each party. One party (its members) cannot enter the instance of another party.
- They have time limits in which the quest progression must be completed. If the quest is not completed, the instance will be destroyed, and players sent back to their Save Points.
- They have cooldown periods, where a player must wait after the time period ends before creating/entering a new instance.
- They do not allow the skill teleport (or Fly Wings). In a solo party, the player will be sent back to their Save Point when logged out more than 5 minutes inside an instance.
- They may restrict certain other skills depending on the instance.
- They are restricted to characters of certain Base Levels.
- The players can not reenter the instance if the players happen to exit the instance before the instance is done (e.g. disconnected more than 5 minutes in a solo party, died then respawn).
- Some instances have an access that must be done before the players can start entering it.
ArunafeltzRO Unique Feature:
Instance Reset Tickets - Allows you to reset the cooldown of the instance
Tier 1:
Sealed Shrine - Requires 5x T1 Instance Reset Ticket
Orc's Memory - Requires 1x T1 Instance Reset Ticket
Tier 2:
Geffen Magic Tournament - Requires 5x T2 Instance Reset Ticket
Old Glast Heim - Requires 5x T2 Instance Reset Ticket
Faceworm Nest 5x T2 Instance Reset Ticket
Tier 3:
Nidhoggur's Nest - Requires 3x T3 Instance Reset Ticket
Endless Tower - Requires 5x T3 Instance Reset Ticket
Now, Let's Talk about a Sharp Shooting Sniper Build (This is Top-Tier, very versatile and a very newbie friendly job for instances.)
Top Gear:
Highly Recommended: Soldier Hat
Increases damage to Boss monsters by 20%.
Increase damage to Normal monsters by 10%.
If refined to +7, increases damage to Boss monsters by 1%.
If refined to +9, increases damage to Boss monsters by 1%.
Highly Recommended only if High Refines:
 Cero Horn
+5% Critical Damage Rate
-5 Agi
-5 Int
+Full Hallow Mask
+2% Critical Damage Rate per refine rate of Cero Horn
+10 Agi
15% Chance to curse on enemy. Evil Marching Hat
Str +2
Attack +2% to all monsters.
If refined to +7 or higher, critical +10%.
If refined to +9 or higher,
the attack and ranged attack damage increases by 5%.
 Captain's Hat
Increases Physical Ranged attack power by 7%.
Max HP +100
Dex +1
Recommended: Cygnus Helm
Reduces damage from Demihuman race by 10%
[Sniper, Stalker, Clown, Gypsy, and Gunslinger Class]
Increases long range attacks by 15%
Only Best Card Required for Top Gear:
(Required for spamming Sharp Shooting)
Kiel-D-01 Card - Reduces all skill's after-cast delay by 40%
Sealed Kiel-D-01 Card - Reduces all skill's after-cast delay by 30%
Middle Gear:
Highly Recommended: Shadow Booster
ASPD +10
Reduces After Cast Delay by 5%.
Highly Recommended only if High Refines: Hawk Eyes
Dex +2
Adds 3% long range distance Atk.
If refine = 7
Additional Dex +1, Adds 2% to Long Distance Atk
If refine = 9Additional Dex +2, Adds 2% to Long Distance Atk
 Full Hollow Mask
Dex+ 2
Atk + 3%, Matk + 3%if refine = 7
Additional Dex + 2
if refine = 9
Additional Atk +3%, Matk +3%+Cero Horn
+20 Agi
-20 Int
+15% Critical Chance/ 15Crit~Small chance of casting using coma on enemy (0.09%)
Recommended:
 Hollow Mask
Bonus: Dex +2
Atk +3%, MAtk +3%
 Fancy Phantom Mask
Str +1
Atk +5%
After Cast Delay reduces by 1%
Max HP +100 for each refine level.
Increases damage of Mammonite and Throw Zeny skills by 20%.
 Robo Eyes
Dex +1
Atk +2%
Matk +2%
Only Best Card Required for Mid Gear:
(Required for spamming Sharp Shooting)
Kiel-D-01 Card - Reduces all skill's after-cast delay by 40%
Sealed Kiel-D-01 Card - Reduces all skill's after-cast delay by 30%Lower Gear:
Highly Recommended: Crimson Rose
Atk +1%
Matk +1%
Max SP +30
Highly Recommended with Combo:
 Captain's Pipe
Reduces damage from Demihumans by 2%.
[+Captain Hat]
Increases long range Physical attacks by 1% for every refine level of Captain Hat.
Recommended:
 Chocolate Donut
Atk +5
Def +2
Max HP +1500
Recover 1 HP every 100 seconds.
 Foxtail
Matk +10
Reduces fixed cast time by 0.1 seconds.
Dex +2
Armor:
Highly Recommended:
 Dragon Armor
- All stats +5
[Mage, Archer, Acolyte, Taekweon, or Ninja Class]
- Increase Physical Damage by 5%, 25% resistance against Silence status.
[Swordsman, Merchant, Thief, Taekwon, or Gunslinger Class]
- Increase Magical Def by 5%, 25% resistance against Stun status.
[+Dragon Armor, Dragon Manteau, and Dragon Shoes Equip Set]
- All stats +5, decreases all incoming magic damage by 5%, increases damage by 5%.
Needed Enchants:
1st Slot: 3% Atk%/Crit Damage%/Long Range Atk%
2nd Slot: 4% Atk%/Crit Damage%/Long Range Atk%
3rd Slot: 5% Atk%/Crit Damage%/Long Range Atk%DO NOT GET CRIT DAMAGE % IF YOU WILL USE THANATOS CARD
Note: Bring 3 Dragon Armors with this cards Compounded
Ktullanux Card -Increases damage against Fire Property monsters by 50%.
Add a 3% chance of auto casting Level 10 Frost Nova on an enemy when the user receives Physical Damage.
Gloom Under Night Card - Increase damage inflicted on Holy Property, Shadow Property, Angel monster and Demon monster by 40%.
Ghostring Card - Enchant an Armor with the Ghost Property. HP Recovery - 25%Another Note: Use the Gloom Under Night Card, Ktullanux offensively (Mostly on the Mvps), If you can't keep up with their damage just use the ghost armor Defensively.
Weapon:
 Dragon Bow
- Dex +3
- Increase Sharp Shooting Damage by 1% per refine rate.
- Increases Long Range Damage by 5%.
[Stalker]
- Increases Double Strafe damage by 1% per refine rate.
- Increases Long Range Damage by 5%.
Note: Bring 2 Dragon Bows, 1 for Normal Mobs and 1 for the MVP/s
Normal Mob Bow Cards:
Highly Recommended:
Turtle General Card - Increases damage inflicted on all enemies by 20%.
Add a 3% chance of automatically casting Level 10 Magnum Break on the enemy when attacking.
The Paper Card - Inflict 20% more damage with Critical attacks.
Drain 1 SP from its owner on each attack.
Angry Student Pyuriel Card - Increase critical damage by 30%.
Increases damage received from all monsters races by 10%.
Recommended:
White Knight Card: ATK +15
Increases physical damage inflicted on Medium and Large size monsters by 20%.
Memory of Thanatos Card - Deals more damage depending on the target's defense.
Drain 1 SP from its owner on each attack.
DEF - 30, Flee Rate - 30Note: Best Combo: 2 cards of each except Thanatos Card (Needs only 1)
MVP Mob Bow Cards:
Highly Recommended:
White Knight Card: ATK +15
Increases physical damage inflicted on Medium and Large size monsters by 20%.
Turtle General Card - Increases damage inflicted on all enemies by 20%.
Add a 3% chance of automatically casting Level 10 Magnum Break on the enemy when attacking.
Abysmal Knight Card - Increase damage on Boss monster by 25%.
Memory of Thanatos Card - Deals more damage depending on the target's defense.
Drain 1 SP from its owner on each attack.
DEF - 30, Flee Rate - 30Note Best Combo: 3 Abysmal Knight Cards + Any card of the Following
Garment:
Highly Recommended:
 Dragon Manteau
- All stats +1
- [Mage, Archer, Thief, Taekweon, or Ninja Class]
- Perfect Dodge +5. Bonus +1 Perfect Dodge per refine.
- [Swordsman, Merchant, Acolyte, Taekwon, or Gunslinger Class]
- Reflect 5% Melee Damage. Bonus +1% Reflect Melee Damage per refine.
- [+Dragon Armor, Dragon Manteau, and Dragon Shoes Equip Set]
Needed Enchants:
1st Slot: 3% Atk%/Crit Damage%/Long Range Atk%
2nd Slot: 4% Atk%/Crit Damage%/Long Range Atk%
3rd Slot: 5% Atk%/Crit Damage%/Long Range Atk%DO NOT GET CRIT DAMAGE % IF YOU WILL USE THANATOS CARD
Recommended Only If need high base stats: Gigant Snake Skin
A head scales of Wormface which defeated in distorted dimension. This demon once called as Jormungand's reincarnate.
MDEF +10.
This manteau resonates with all types of Temporal Boots.
All Stats + 2 MaxHP +15% and MaxSP +5% when equipped with any type of Temporal Boots.Note: Just Aim for Good Dex Enchants, you can get double +7 dex stats if you're lucky enough! (Just use this for Dex Purposes)
Cards:
Highly Recommended:
Superior Deviling Card: Reduces damage received from [Neutral] element attacks by 50%.
Increases damage received from all elements except [Neutral] element by 50%.
[Sniper & Gunslinger]
[If no Ghostring Card & Using Two Hand Weapon]
Additional 10% Neutral Resistance
Deviling Card - Reduces damage received from [Neutral] element attacks by 50%.
Increases damage received from all elements except [Neutral] element by 50%.
Giant Whisper Card - Flee Rate + 10
[Base STR >= 80]
ATK + 20
[Base VIT >= 80]
Maximum HP + 3%
[Base LUK >= 80]
Critical Rate + 3
Recommended:
Raydric Card - Increase resistance to Neutral Property attacks by 20%.
Noxious Card - Reduces damage received from [Neutral] element attacks by 10%.
Reduces damage received from ranged attacks by 10%.Footgear:
Highly Recommended:
 Dragon Boots
- Maximum HP and Maximum SP +25%
- Movement Speed +70%
- Increase Resistance against Sleep status by 50%
- [Mage, Archer Acolyte, Taekwon or Ninja Class]
- Max HP +1%*(Base lvl/10)
- [Swordsman, Merchant, Thief, Taekwon, or Gunslinger Class]
Max SP +1%*(Job lvl/10)
[+Dragon Armor, Dragon Manteau, Dragon Shoes Equipment Set]
Needed Enchants
1st Slot - 5% Atk to Boss Monsters
2nd Slot - 10% Atk to Undead/Dark Property
3rd Slot - 10% Atk to Boss MonstersRecommended Only If need high base stats:
 Temporal Dex Boots
-
Maximum HP and Maximum SP+ 20%
Movement Speed 70%
[Mage, Archer, Acolyte, Taekwon or Ninja Class]
Max HP + 1% * (Base Lvl/10)
[Swordman, Merchant, Thief Class, Taekwon or Gunslinger Class]
Max SP + 1% * (Job Lvl/10)
________________________
For each 2 refine levels:
MaxHP +100
MaxSP +10
DEX +2
________________________
Base DEX at least 120:
Reduces fixed cast time of all skills by 0.5 sec.
->Increases ranged physical attack by 10%.
Needed Enchants:
Long Range Atk 8%
Hawk Eye (+10 Dex)
Note: Bring 2 footgears with the following Cards:
Footgear 1: This is for Kiting/Moving Around
Eddga Card - Max HP - 25%
Adds a permanent Level 1 Endure effect to the compounded item.Or
Superior Eddga Card - Enable effect of the Endure skill so long as the Footgear to which this card is compounded is equipped.
Footgear 2: This is for Damage
Faceworm Queen Card - Max HP - 10%
Crit + 15
For every upgrade level of the compounded item,
Crit + 1
Increases critical damage on targets by 1%.Blut Haase Card - ATK +3%, ranged physical attack damage +5%.
Geffen Bully Card - Aspd + 3%
Increases critical damage on targets by 5%.DO NOT GET CRIT DAMAGE % IF YOU WILL USE THANATOS CARD
Accessory:
Highly Recommended:
 Archer Figure
Dex + 5
Attack + 10
Long Range Damage + 7%
Recommended: Bow Thimble
A finger accessory for archers which helps improve their accuracy.
Ranged Attack Damage + 3%.Cards:
Highly Recommended:
Ifrit Card - Increase ATK, Critical Rate, and HIT every 4 Job Level.
Add a 1% chance of auto casting Level 10 Earthquake on the user when the user receives Physical Damage.
Zerom Card - DEX + 3Note: Just use Ifrit Card If you're a critical sharp shoot type.
Note 2: Use Zerom if you're using a Thanatos Card.
Note 3: If ever you have donate Items such as a Dragon Ring It is more efficient to use it.Costumes:
Actually, Any costume will do. Just make sure you have Maxed out any of this Enchants.
1st Slot: 5% Long Range Atk or 5% Crit Damage / 3% Atk
2nd Slot: 8% Crit Damage / 3% Atk
3rd Slot: 10% After Cast Delay (Need atleast one in 1 costume)/ 7% Atk or 7% Long Range Atk / 10% Crit DamageDO NOT GET CRIT DAMAGE % IF YOU WILL USE THANATOS CARD
Consumables: (Items can be found in the tool dealer or the items may be farmable)
Highly Needed:
Hunter Talisman - Soul Links to Hunters
and Snipers giving them special buffs
for the skill's duration.
-Effectiveness of Beast Bane is increased
by Hunters/Sniper STR.
-If Double Strafing is Level 10, a new skill,
Beast Strafing, will be available.
-There is a low chance of Falcon Assault occurring
automatically per shot with a bow
-Making their Sharp Shooting halving its After Cast
DelayAbrasive - An abrasive that
adds sharpness to
a weapon. Increases
Critical Rate by 30
for 5 minutes.
If you are incapacitated,
the item effect will disappear.
(Use if Crit Type)Anti-Abrasive - An abrasive that
adds sharpness to
a weapon. Decreases
Critical Rate by 100
for 5 minutes.
If you are incapacitated,
the item effect will disappear.
(Best use with Thanatos Card)All +10 Food Stats - Just a boost for stats
Blessing Scrolls - Casts Level 10 Blessing on user.Increase Agi Scrolls - Casts Level 10 Increase Agility on user.
Panacea - Cures the user of [Blind], [Curse], [Confusion], [Poison] and [Silence] statuses.
IMPORTANT: (May be found in the event shop)
Token of Siegfried - Not a consumable but Allows you to resurrect yourself in battle.
Needed:
Aloevera - Casts Level 1 Provoke on user.
Anodyne - Casts Level 1 Endure on user. (For Lazy Switchers to Eddga XDDD)
Box of Resentment - Increases Atk by 20 for 60 seconds
NOTE: PLEASE DON'T FORGET YOUR HEALING POTIONS/YGG BERRY XDDD
NOTE 2: Don't forget to also bring Bubble gum for spiking those drop rates!
Stats:
1-35 STR - Just For Weight purposes
110-130 AGI - As long as you reach max ASPD
130-180 VIT - Need a lot of HP
1-75 INT - Just For SP
250-255 DEX - Main Source of Damage
1-99 LUK - Totally Depends if you're a Crit type or Thana type.INSTANCES:
Tier 1 Instances:
Sealed Shrine
Requirements:
-Need Atleast 2 people in the party and is active.Items to loot: #6004
Steps:
1. Type @instance and warp to Sealed Shrine from the Instance Manager, your Party leader must speak with Friar Patrick

2. After asking to enter, the party must wait for the instance to be created. The party will have 5 minutes to enter the dungeon, or else the dungeon will be destroyed. If the dungeon is destroyed, the party may request another one immediately. A party may leave the shrine, but they must return to the shrine in 5 minutes. The party will have 2 hours to finish the dungeon. After the instance expires, the party leader and anyone that participated in the party will be unable to create a new instance for 12 hours. (Party members can go with another party leader who can create the dungeon, however.)
- Note: A window will appear showing pertinent time limits for the dungeon. If it is closed, it can be opened again using the shortcut Alt+B.
3. Once inside, the party leader must talk to the Hero NPC to begin the quest in the Shrine (141, 221). Snatch, Teleport/Fly Wings, Safety Wall and Assumptio are disabled in the dungeon. Assumptio Scrolls can be used, however.
-
Dungeon Monsters
- 40 Wraith Dead
- 40 Flame Skull
- 20 Khalitzburg
- 40 Skeleton General
- 30 Evil Druid
- 30 Wind Ghost
- 20 Lude
- 10 Banshee
- 20 Ancient Mimic
- 40 Zombie Master
Monsters Do respawn here, and give both Experience and Drops. Experience is also lost upon death on both levels of the dungeon.
4. First from the start point, head to the Hero (Marked in yellow) and talk to it. It will ask you to bring a
 Pendant of Spirit. Talk to the Falling Graves (Marked in blue). The correct one will give a
  Pendant of Spirit. Only the Party Leader can obtain and return the pendant to the Hero (141, 221).
5. Return the
 Pendant of Spirit to the first Falling Grave. The NPC will instruct you to meet him in the center of the Catacomb.
6. Now talk to the Soul of Ancient Hero in the middle of the map (Marked in green). He will require one representative of the party (the party leader) to get 10
 Essence of Fire. He will also instruct you to gather
  Token of Apostle. Only the party leader and anyone who left the dungeon during the quest needs to have a Token of Apostle to progress to the next floor. You will have 1 hour to finish his task.
-
 Essence of Fire are obtained from Torches (Marked in red).
-
 Token of Apostle are obtained automatically by killing any monster named Apostle of Baphomet. These are tradable among party members, but only the party leader and anyone who left the dungeon during the course of the quest are required to have them in order to progress to the next floor.
- If the party leader disconnects, respawns, or otherwise leaves the dungeon while collecting Essence of Fire, the Soul of Ancient Hero will no longer correctly recognize the party leader, and the quest cannot be continued.
7. After returning with the items, Soul of Ancient Hero will open the portal to the second floor. The portal can be found at the lower right side of the floor.
8. Once on the second floor, talk to The Main Altar to summon Great Demon Baphomet. Great Demon Baphomet is invulnerable to your attacks.
9. The Soul of Ancient Hero will tell you of seals that will weaken Baphomet. He will instruct you to go to 5 seal locations on the map. The locations are: 2 o'clock, 4 o'clock, 8 o'clock, 10 o'clock and the middle (above The Main Altar).10. Great Demon Baphomet must be brought INTO the seal and the seal must be activated to weaken Baphomet. Upon activating a seal, your party has a few seconds to damage Baphomet. The Soul of Ancient Hero will tell your party which seal to activate next. The party member who activates a seal will be Stone Cursed for approximately 30 seconds. It is during this time that the other party members must attack and damage Baphomet. The party member who activates a seal cannot activate two seals in a row. Thus, a party must have a rotation for members who will activate seals.
Rewards
Upon killing Great Demon Baphomet, one of the possible drop items is a Cursed Baphomet Doll, which is used to make the headgear,
 Giant Magestic Goat.
Process of headgear creation:
1. After killing Great Demon Baphomet and receiving a
 Cursed Baphomet Doll (10% chance to drop) in your inventory: Do not talk to the Champion NPC to warp out. Use a Butterfly Wing or use the Warp Portal acolyte skill to get out of the instance map. DO NOT talk to any other NPC, AT ALL. Come back to Friar Patrick first and DISCUSS ONLY THE DOLL.
- Note: Any other choice but talking to Friar Patrick about the doll that you hold in your inventory will result in failure of the headgear quest. Step 2 will not activate unless you have spoken to the Friar about the doll first. If you talk to any other NPC, or select any other option, your completion status on the instance is reset. This means if you mess up this step by selecting any other option than the doll option or talking to any other NPC, you might possibly have to redo the entire Sealed Shrine Quest again, gain completion of the instance according to the server, and regain the doll. You have been warned!
2. Speak with Rust Blackhand (prt_monk 261,91) with the following items to make a
 Giant Magestic Goat.
-
1
 Cursed Baphomet Doll
-
1
 Magestic Goat
-
30
 Crystal of Darkness
-
50
 Fragment of Darkness
- 990,000 Zeny
 Giant Magestic Goat
A headgear made from the horns of Baphomet.
Increases physical damage to the Demi Human monster by 12%.
As your JOB Level increases, the helm grants additional ATK.Monsters Info
Image Name Level HP Size / Race / Element 
Wind Ghost 51 12,050 Medium / Demon / Wind 3 
Evil Druid 58 41,265 Large / Undead / Undead 4 
Wraith Dead 74 107,552 Large / Undead / Undead 4 
Lude 36 8,035 Small / Undead / Undead 4 
Ancient Mimic 60 20,200 Large / Formless / Neutral 3 
Khalitzburg 63 48,190 Large / Undead / Undead 1 
Zombie Master 62 35,527 Medium / Undead / Undead 1 
Flame Skull 60 25,200 Small / Demon / Ghost 3 
Banshee 81 87,777 Medium / Demon / Dark 4 
Skeleton General 73 43,505 Medium / Undead / Undead 1 
Great Demon Baphomet

98 75,000,000 Large / Demon / Dark 3 ArunafeltzRO Special:
Gather 10x
 Cursed Baphomet Doll and you can craft this amazing middle headgear with some other requirements.
(Veil 88,123) Chrome Quests
(Special Equipments Section)
 Visor Chroma
Increases Variable Cast Time by 100%
Reduces SP Recovery by 100%
Ignore 20% MDEF of Normal Enemy
Reduces After Cast Delay by 40%
[Refine Bonus]
Ignores 1% MDEF of Normal Enemies
per Refine Rate.Requirements:
1x Unique Glasses
1x Fallen Bishop Hibram Card
2x Kiel-D-01Card
10x Gemstone
10x Cursed Baphomet DollVideo:
WILL BE UPLOADED SOON AFTER DONE WITH THE GUIDE!
Orc's Memory
Items To loot: #50101
- With 1 or more people in your party, the party leader needs speak with Dimensional Gorge Piece (gef_fild10 242, 202) to "Reserve the Orc's Memory".
-
After the dungeon is created, speak to the Dimensional Gorge Piece to "Enter the Dungeon".
- Note: A window will appear showing pertinent time limits for the dungeon. If it is closed, it can be opened again with with the shortcut Alt+B.
- Note 2: There is a 2 hour time limit for completing the quest before the instance is destroyed.
-
Once inside, the party leader must speak to Kruger (1@orcs 180,29) to start the instance.
-
To pass each zone on the first map, you must kill the Enchanted Orc in that zone (Enchanted Orcs are identical to Orc Warriors). Kruger explains that each non-enchanted orc you kill will cause a High Orc to spawn near the exit.
- Depending on the challenge you wish to face, you may kill only the Enchanted Orc, or instead kill everything. If enough Orcs are killed, a large mob of Stalatic Golem will spawn at the end of the 4th zone.
- The first Enchanted Orc spawns at (142, 87). Killing it opens a portal at (168, 125).
- The second Enchanted Orc spawns near (106, 108). Killing it opens a portal at (89, 94).
- The third Enchanted Orc spawns at (32, 44). Killing it opens a portal at (38, 105).
- The fourth Enchanted Orc spawns near (24, 178). Killing it opens a portal at (21, 189). All monsters on 1@orcs will de-spawn as soon as the last Enchanted Orc dies.
-
On the second map, speak to Kruger again (2@orcs 35, 169). He explains that you will need to extinguish the Braziers to proceed to the next zone.
- As before, depending on the challenge you wish to face, you may kill only the specific guards, or instead kill everything. If enough Orcs are killed, a large mob of Wraiths will spawn at the end of the 4th zone.
- Each Orc Zombie killed will respawn as an Orc Archer.
- Each Orc Skeleton killed will respawn as a High Orc.
- The Braziers in the first zone are at (27, 164), (55, 154), (108, 145), and (99, 179). After being activated in order, The Chief Orc of Safeguards will spawn at (110, 156). Killing him will open a portal at (48, 100).
- The Braziers in the second zone are at (35, 92), (33, 70), (71, 30), and (84, 50). After being activated in order, Orc Sniper will spawn at (67, 64). Killing him will open a portal at (101, 55).
- The Braziers in the third zone are at (143, 144), (162, 134), (145, 116), and (137, 98). After being activated in order, Depraved Vengeful Orc Spirit will spawn at (156, 147). Killing him will open a portal at (167, 104).
- After the Depraved Vengeful Orc Spirit dies, a Depraved Orc Hero and Shaman Cargalache will spawn in the 4th zone.
-
When Shaman Cargalache dies, all monsters on 2@orcs will de-spawn (except the Anophles and Orc Hero).
- Note: If Shaman Cargalache dies at the same moment as another Orc, a bug may prevent the de-spawn.
ArunafeltzRO Special:
The Orc Hero in this instance Has 150,000,000 HP (The Highest & Strongest MVP HP in all instances) This Orc Hero gives an item called Orc Hero Headress (item #50101) and give x8 of these.
This is used in creating special items and superior cards:(Veil 85,80)
(Equipments Section)
 Large Orc Hero Helm
Reduce Damage from Demihuman Monster by 10%
Grants Level 5 Auto Guard SkillRequirements:
x250 Orc Hero Headress
x10 Mithril ARO Coin(Veil 88,123) Chrome Quests
(Special Cards Section)
Superior Orc Hero Card - Vit +5, Max Hp +5%, Prevents Stun status.
Requirements:
x50 Orc Hero Card
x1 Tao Gunka Card
x100 Orc Hero Headress
x10 Mithril ARO CoinVideo:
WILL BE UPLOADED SOON AFTER DONE WITH THE GUIDE!
Tier 2 Instances:
WILL CONTINUE LATER OR TOMORROW.



Grand Raffle Event! Anniversary Special
in Aruna Events
Posted
In-game Name: Aucrezia
Discord ID: Padubolg#7514
Unique Game ID:2290409670